Using tiled images as minimap
Introduction
In this tutorial, we will learn to create a minimap using tiled images. The code is written in TypeScript and will also demonstrate how to achieve zoom on minimap by loading and rendering image tiles at different zoom levels using quadtree data structure, we will also learn to sync the camera movements between minimap and 3D space using novorender's webgl-api.
This tutorial assumes that you have a basic understating of HTML 5 Canvas API, novorender's webgl-api (including loading scenes and searching), and finally, a basic knowledge of Quadtree data structure.
It is recommend to get a quick grasp of these concepts before moving forward.
Structure
We will use two HTML canvas elements: one for the 3D model, and the other will be used to show the minimap. In the demo code, they're referred to as canvas and previewCanvas.
In some places you'll notice that we use the gl-matrix library for linear algebra (vector and matrix math). 3D vectors are defined as vec3 types, which equates to a array of length=3. If all you wish to do is to pass in parameters or read values, you may treat these types a regular array of numbers, i.e. you don't need the gl-matrix library itself for this. If you do wish to perform some linear algebra yourself, however, we recommend you do add it to your own code as well. Just make sure you use same major version as us (^3.3.0).
Loading and displaying the scene
Let's start by loading a public scene using Data JS API
// Initialize the data API with the Novorender data server service
const dataApi = dataJsApi.createAPI({
    // we're loading a public scene so it doesn't require any auth header,
    // see `https://docs.novorender.com/docs/tutorials/loading_scenes#private-scenes` if you want to load private scenes.
    serviceUrl: DATA_API_SERVICE_URL,
});

// load a public scene
const sceneData = await dataApi.loadScene("fa20cb75e20e42b789c8e0f18ef5cc6f");

// some necessary render config, that will be applied to the loaded scene
const renderSettings: RecursivePartial<RenderSettings> = {
    quality: {
        resolution: { value: 1 }, // Set resolution scale to 1
    },
    clippingVolume: {
        enabled: true,
        mode: "union",
        planes: [[0, 1, 0, -5.5]],
    },
};
Next, we'll create a function that will create the view and a camera controller for the 3D space:
async function initView(webglApi: typeof WebglApi, canvas: HTMLCanvasElement, sceneData: SceneData, renderSettings: RecursivePartial<RenderSettings>): Promise<View> {
    // Destructure relevant properties into variables
    const { url, db, settings, camera: cameraParams } = sceneData;

    // initialize the webgl api
    const api = webglApi.createAPI();

    // Load scene
    const scene = await api.loadScene(url, db);

    // Create a view with the scene's saved settings
    const view = await api.createView(settings, canvas);

    view.applySettings(renderSettings);

    // Create a camera controller with the saved parameters with flight as fallback
    let camera: WebglApi.CameraControllerParams = cameraParams ?? { kind: "flight" };
    camera = { ...camera, ...{ yaw: 0, pitch: -90 } };
    view.camera.controller = api.createCameraController(camera as WebglApi.FlightControllerParams, canvas);

    // Assign the scene to the view
    view.scene = scene;

    return view;
}
this function will be invoked after loading the scene.
Finally, run the render loop to display the output:
// Create a bitmap context to display render output
const ctx = canvas.getContext("bitmaprenderer");

// render loop
while (true) {
    // Render frame
    currentOutput = await view.render();
    {
        // Finalize output image
        const image = await currentOutput.getImage();
        if (image) {
            // Display the given ImageBitmap in the canvas associated with this rendering context.
            ctx?.transferFromImageBitmap(image);
            // release bitmap data
            image.close();
        }
    }
    currentOutput.dispose();
}
That is all the code that's necessary for loading a scene.
Loading and displaying the preview image
PDF documents uploaded to Novorender will have a preview property that can be used to display the PDF as an image. This image can be found by using database search and getting the metadata.
Below is the code that we will be using the fetch the image:
// perform a db search to get the metadata
const iterator = scene?.db?.search(
    {
        searchPattern: [{ property: "Novorender/Document/Preview", exact: true }],
    },
    undefined,
);
const iteratorResult = await iterator?.next();
const data = await iteratorResult?.value.loadMetaData();
let image = "";
for (const prop of data.properties) {
    if (prop[0] === "Novorender/Document/Preview") {
        const url = new URL((scene as any).url);
        url.pathname += prop[1];
        // This is the PDF image URL
        image = url.toString();
    }
}
Now the image can be drawn on the previewCanvas:
// get the 2D context
const context = previewCanvas.getContext("2d");

const img = new Image();
img.onload = function () {
    context.drawImage(img, 0, 0, img.width, img.height, 0, 0, img.width, img.height);
};
img.src = image;
Now that we have completed the initial steps, we will now proceed to implementing the core logic of the minimap.
Quadtree
When dealing with large images or PDF previews, loading the entire high-quality image at once and then zooming can be resource-intensive and slow. Quadtree provides an effective solution by breaking down the image into smaller tiles, enabling efficient storage and retrieval. Each tile represents a specific region of the image, allowing us to load only the required portions based on the user's viewport and zoom level.
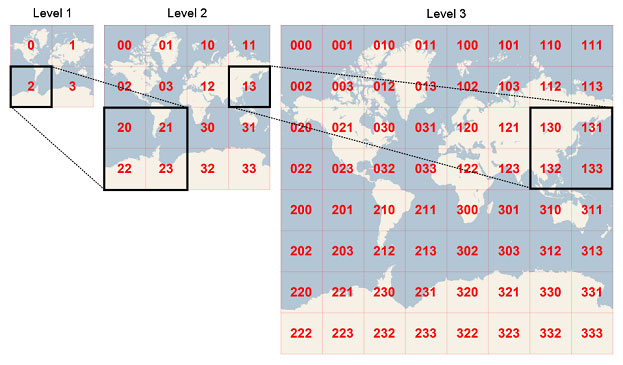
Each tile is represented by its Quadkey, Quadkeys have some important characteristics. Firstly, the length of a quadkey is the same as the level of detail for the tile it represents. Secondly, the quadkey of a tile always begins with the quadkey of its parent tile (the tile that contains it at the previous level). For instance, in the example given, tile 2 is the parent of tiles 20 through 23, and tile 13 is the parent of tiles 130 through 133.
The image for each tile can be fetched by its quadkey. For instance, if we wanted to load the image for the first tile in level 2, we would simply have to append its quadkey to the original image's URL like this: "sample_image_" + 00 + ".jpg"
Creating Quadtree
Let's start by creating a class named QuadNode. This class will define some methods for creating (see the split() method) and searching (retrieve()) the quads within the quadtree.
Below is the implementation that we'll use in the demo:
class QuadNode {
    /**
     * The numeric boundaries of this node.
     * @readonly
     */
    bounds: NodeGeometry;

    /**
     * The level of this node.
     * @defaultValue `0`
     * @readonly
     */
    level: number;

    Id: string;

    empty = false;

    nodes: QuadNode[];

    constructor(bounds: { x: number; y: number; width: number; height: number; Id: string }, level: number) {
        this.bounds = {
            x: bounds.x || 0,
            y: bounds.y || 0,
            width: bounds.width,
            height: bounds.height,
        };
        this.level = level || 0;
        this.nodes = [];
        this.Id = bounds.Id;
    }

    /**
     * Split the node into 4 subnodes.
     */
    split(splitWidth: number, splitHeight: number): void {
        const level = this.level + 1;
        const { bounds } = this;

        const width = splitWidth / 2,
            height = splitHeight / 2,
            x = bounds.x,
            y = bounds.y;

        // max 5 levels
        if (level > 6) {
            return;
        }

        const coords = [
            { x: x, y: y },
            { x: x + width, y: y },
            { x: x, y: y + height },
            { x: x + width, y: y + height },
        ];
        let _id;
        {
            for (let i = 0; i < coords.length; i++) {
                if (level === 0) {
                    _id = "root";
                }
                if (level === 1) {
                    _id = i.toString();
                } else {
                    _id = this.Id + i.toString();
                }
                const childWidth = Math.min(width, bounds.width - (coords[i].x - bounds.x));
                const childHeight = Math.min(height, bounds.height - (coords[i].y - bounds.y));
                this.nodes[i] = new QuadNode(
                    {
                        x: coords[i].x,
                        y: coords[i].y,
                        height: childHeight,
                        width: childWidth,
                        Id: _id,
                    },
                    level,
                );

                if (childWidth <= 0 || childHeight <= 0) {
                    this.nodes[i].empty = true;
                } else {
                    this.nodes[i].split(width, height);
                }
            }
        }
    }

    overlaps(obj: NodeGeometry): boolean {
        const { bounds } = this;
        const maxBoundX = bounds.x + bounds.width;
        const maxBoundY = bounds.y + bounds.height;
        const maxObjX = obj.x + obj.width;
        const maxObjY = obj.y + obj.height;
        const insideX = (obj.x >= bounds.x && obj.x <= maxBoundX) || (maxObjX >= maxBoundX && obj.x <= maxBoundX) || (maxObjX >= bounds.x && maxObjX < maxBoundX);
        const insideY = (obj.y >= bounds.y && obj.y <= maxBoundY) || (maxObjY >= maxBoundY && obj.y <= maxBoundY) || (maxObjY >= bounds.y && maxObjY < maxBoundY);
        if (insideX && insideY) {
            return true;
        }
        return false;
    }

    /**
     * Return all objects that could collide with the given geometry.
     * @param obj - geometry to be checked
     * @param testLevel - level to be checked
     * @returns Array containing all detected objects.
     */
    retrieve(obj: NodeGeometry, testLevel: number): QuadNode[] {
        let returnObjects: QuadNode[] = [];
        // if we have subnodes, retrieve their objects
        if (this.nodes.length && this.level < testLevel) {
            for (let i = 0; i < this.nodes.length; i++) {
                const node = this.nodes[i];
                if (!node.empty && node.overlaps(obj)) {
                    returnObjects = returnObjects.concat(node.retrieve(obj, testLevel));
                }
            }
        } else {
            returnObjects.push(this);
        }
        return returnObjects;
    }
}
Usage example
The QuadNode class can be used to create a quadtree using the following example:
const width = 800; // width of the root Quad.
const height = 600; // height of the root Quad.
const level = 1; // root level
const quadTree = new QuadNode({ x: 0, y: 0, width, height, Id: "" }, level);

// Split the nodes into 4 subnodes/quads until reaching max levels of 5.
quadTree.split(splitWidth, splitHeight);
Zooming in/out on canvas using quadtree
Now that we know how to create a quadtree, we can now move forward to implement the tile based zoom on our previewCanvas, let's start by adding an onWheel event listener on our minimap (aka previewCanvas).
Below code shows how to use onwheel event listener to zoom in/out on canvas using mouse wheel or touchpad:
previewCanvas.onwheel = async (e) => {
    e.preventDefault();

    wheelDelta += e.deltaY * -0.01;
    wheelDelta = Math.min(Math.max(1, wheelDelta), 5);
    currentLevel = Math.ceil(wheelDelta);

    if (currentLevel === 1) {
        // reset the zoom
        level = currentLevel;
        try {
            const initialImage = await loadImage(preview as string);
            if (previewCanvasContext2D) {
                previewCanvasContext2D.clearRect(0, 0, previewCanvas.width, previewCanvas.height);
                previewCanvasContext2D.drawImage(initialImage, 0, 0, previewCanvas.width, previewCanvas.height);
            }
        } catch (error) {
            console.error("Failed to load the preview image ", error);
        }
        currentArea = undefined;
        elements = undefined;
        zoomedImage = undefined;
        return;
    }
    if (level === currentLevel) {
        return;
    }
    if (level === 2) {
        level++;
    }

    level = currentLevel;

    // Get the position of the click relative to the canvas
    const rect = previewCanvas.getBoundingClientRect();
    let centerX = e.clientX - rect.left;
    let centerY = e.clientY - rect.top;
    const width = previewCanvas.width / currentLevel;
    const height = previewCanvas.height / currentLevel;

    if (currentArea) {
        const previousAreaMinX = currentArea.x;
        const previousAreaMinY = currentArea.y;
        centerX = previousAreaMinX + centerX / currentLevel;
        centerY = previousAreaMinY + centerY / currentLevel;
    }

    const right = previewCanvas.width - (centerX + width / 2);
    const bot = previewCanvas.height - (centerY + height / 2);

    let x = centerX - width / 2;
    if (right < 0) {
        x += right;
    }

    let y = centerY - height / 2;
    if (bot < 0) {
        y += bot;
    }

    const area: NodeGeometry = {
        x: Math.max(0, x),
        y: Math.max(0, y),
        width: width,
        height: height,
    };

    currentArea = area;
    elements = quadTree.retrieve(currentArea, currentLevel);

    // draw and stitch the found images on canvas
    await drawAndStitchOnCanvas(elements, currentArea);
};
Breakdown of above code
We start by defining a rectangle to retrieve the quads that intersect with it:
const area: NodeGeometry = {
    x: Math.max(0, x),
    y: Math.max(0, y),
    width: width,
    height: height,
};
Then we call retrieve() method of MinimapHelper to search for all the quads that intersect with the rectangle created above:
elements = quadTree.retrieve(previousArea, currentLevel);
And finally call drawAndStitchOnCanvas() on found elements to load the image tiles and stitch them together on the minimap (previewCanvas):
const drawAndStitchOnCanvas = async (elements: QuadNode[], area: NodeGeometry) => {
    // clear the canvas
    previewCanvasContext2D?.clearRect(0, 0, previewCanvas.width, previewCanvas.height);
    // Loop through the found nodes and draw images based on node on the canvas
    for (let i = 0; i < elements.length; i++) {
        const node = elements[i];
        const nodeBoundsWidth = node.bounds.width;
        const nodeBoundsHeight = node.bounds.height;
        try {
            const loadedImage = await loadImage(preview as string, node.Id);

            const boundsWRatio = loadedImage.naturalWidth / nodeBoundsWidth;
            const boundsHRatio = loadedImage.naturalHeight / nodeBoundsHeight;

            const cutLeft = Math.max(0, area.x - node.bounds.x);
            const cutRight = Math.max(0, node.bounds.x + node.bounds.width - (area.x + area.width));
            const cutX = cutLeft + cutRight;

            const cutTop = Math.max(0, area.y - node.bounds.y);
            const cutBot = Math.max(0, node.bounds.y + node.bounds.height - (area.y + area.height));
            const cutY = cutTop + cutBot;

            const zoom = currentLevel;

            const x = (Math.max(node.bounds.x, area.x) - area.x) * zoom;
            const y = (Math.max(node.bounds.y, area.y) - area.y) * zoom;

            const sx = cutLeft * boundsWRatio;
            const sy = cutTop * boundsHRatio;

            const sWidth = loadedImage.naturalWidth - sx - cutRight * boundsWRatio;
            const sHeight = loadedImage.naturalHeight - sy - cutBot * boundsHRatio;

            const dWidth = (node.bounds.width - cutX) * zoom;
            const dHeight = (node.bounds.height - cutY) * zoom;

            previewCanvasContext2D?.drawImage(loadedImage, sx, sy, sWidth, sHeight, x, y, dWidth + 1, dHeight + 1); // +1 for pixel overlap to avoid grid like lines
        } catch (err) {
            console.error("Something went wrong", err);
        }
    }
};
Minimap
In this section, we will learn how to download and create the minimap.
Creating minimap
Let's initialize a class called MinimapHelper. This class contains useful methods for interacting between the PDF preview (toMinimap()) and the 3D Space (toWorld()), you'll see their actual usage in the demo provided at the end of this tutorial.
/**
 * Class representing a MinimapHelper that also contains an instance of `QuadNode` class.
 */
export class MinimapHelper {
    /**
     * Subnodes of this node
     * @defaultValue `[]`
     * @readonly
     */
    quadTree: QuadNode;

    pixelWidth = 0;
    pixelHeight = 0;
    currentIndex = 0;

    glMatrix!: typeof GlMatrix;

    /**
     * Minimap Constructor
     * @param minimaps - minimap info
     * @param glMatrix - glMatrix dependency
     * @param quadTreeProps - bounds and properties of the node
     * @param level - depth level (internal use only, required for subnodes)
     */
    constructor(
        width: number,
        height: number,
        readonly minimaps: MinimapInfo[],
        glMatrix: typeof GlMatrix,
    ) {
        this.pixelWidth = width;
        this.pixelHeight = height;
        this.glMatrix = glMatrix;
        this.quadTree = new QuadNode({ x: 0, y: 0, width, height, Id: "" }, 1);
    }

    async split(topLevelWidth: number, topLevelHeight: number) {
        const numImagesWidth = topLevelWidth / 256;
        const cw = Math.ceil(Math.log(numImagesWidth) / Math.log(2));
        const widthSplitBy = Math.pow(2, cw) / 2;
        const widthSplit = widthSplitBy / numImagesWidth;

        const numImagesHeight = topLevelHeight / 256;
        const ch = Math.ceil(Math.log(numImagesHeight) / Math.log(2));
        const heightSplitBy = Math.pow(2, ch) / 2;
        const heightSplit = heightSplitBy / numImagesHeight;

        this.quadTree.split(this.pixelWidth * widthSplit * 2, this.pixelHeight * heightSplit * 2);
    }

    retrieve(obj: NodeGeometry, testLevel: number): QuadNode[] {
        return this.quadTree.retrieve(obj, testLevel);
    }

    toMinimap(worldPos: vec3): vec2 {
        const curInfo = this.getCurrentInfo();
        const diff = this.glMatrix.vec3.sub(this.glMatrix.vec3.create(), worldPos, curInfo.corner);
        const diffX = this.glMatrix.vec3.dot(diff, curInfo.dirX);
        const diffY = this.glMatrix.vec3.dot(diff, curInfo.dirY);

        const x = (diffX / curInfo.dx) * this.pixelWidth;
        const y = this.pixelHeight - (diffY / curInfo.dy) * this.pixelHeight;
        return this.glMatrix.vec2.fromValues(x, y);
    }

    toWorld(minimapPos: vec2): vec3 {
        const curInfo = this.getCurrentInfo();
        const diffX = minimapPos[0] / this.pixelWidth;
        const diffY = 1 - minimapPos[1] / this.pixelHeight;
        const pos = this.glMatrix.vec3.clone(curInfo.corner);
        pos[1] += 10;
        this.glMatrix.vec3.scaleAndAdd(pos, pos, curInfo.dirX, curInfo.dx * diffX);
        this.glMatrix.vec3.scaleAndAdd(pos, pos, curInfo.dirY, curInfo.dy * diffY);
        return pos;
    }

    directionPoints(worldPos: vec3, rot: quat, length: number): vec2[] {
        const path: vec2[] = [];
        path.push(this.toMinimap(worldPos));
        const rotA = this.glMatrix.quat.rotateY(this.glMatrix.quat.create(), rot, Math.PI / 8);
        const dirZ = this.glMatrix.vec3.fromValues(0, 0, -1);
        const dirA = this.glMatrix.vec3.transformQuat(this.glMatrix.vec3.create(), dirZ, rotA);
        const posA = this.glMatrix.vec3.scaleAndAdd(this.glMatrix.vec3.create(), worldPos, dirA, length);
        path.push(this.toMinimap(posA));

        const rotB = this.glMatrix.quat.rotateY(this.glMatrix.quat.create(), rot, -Math.PI / 8);
        const dirB = this.glMatrix.vec3.transformQuat(this.glMatrix.vec3.create(), dirZ, rotB);
        const posB = this.glMatrix.vec3.scaleAndAdd(this.glMatrix.vec3.create(), worldPos, dirB, length);
        path.push(this.toMinimap(posB));

        return path;
    }

    getCurrentInfo() {
        return this.minimaps[this.currentIndex];
    }

    getMinimapImage() {
        return this.getCurrentInfo().image;
    }

    getAspect() {
        return this.getCurrentInfo().aspect;
    }

    update(camPos: vec3): boolean {
        for (let i = 1; i < this.minimaps.length; ++i) {
            if (camPos[1] - 0.5 < this.minimaps[i].elevation) {
                if (i !== this.currentIndex) {
                    this.currentIndex = i - 1;
                    return true;
                }
                return false;
            }
        }
        if (this.currentIndex !== this.minimaps.length - 1) {
            this.currentIndex = this.minimaps.length - 1;
            return true;
        }
        return false;
    }
}
The MinimapHelper class also creates a new instance of the QuadNode in the constructor. Therefore, when we create a new instance of MinimapHelper, it will contain our quadtree, which can be accessed using the quadTree property.
Downloading the minimap
After initializing the class mentioned above, we will proceed to create a function responsible for downloading the minimap. It should be noted that this function includes a DB search to obtain information about the "Corners" and "Size" of Quadtree, which is necessary for the MinimapHelper class we created earlier. "Corners" info is utilized for the transformation between image space and 3D space and the "Size" property is used to correctly split the Quadtree.
async function downloadMinimap(width: number, height: number, scene: SceneData, glMatrix: typeof GlMatrix): Promise<MinimapHelper> {
    const minimaps: MinimapInfo[] = [];

    // perform a db search to get the metadata
    const iterator = scene?.db?.search(
        {
            searchPattern: [{ property: "Novorender/Document/Preview", exact: true }],
        },
        undefined,
    );
    const iteratorResult = await iterator?.next();
    const data = await iteratorResult?.value.loadMetaData();

    let corner = glMatrix.vec3.create();
    const dirX = glMatrix.vec3.create();
    const dirY = glMatrix.vec3.create();
    let dx = 0;
    let dy = 0;
    let aspect = 0;
    let elevation = 0;
    let image = "";
    let topLevelWidth = 0;
    let topLevelHeight = 0;

    for (const prop of data.properties) {
        switch (prop[0]) {
            // get the corners
            case "Novorender/Document/Corners": {
                const points = prop[1].split("]");
                const c1 = points[0].replaceAll("[", "").split(",");
                const c2 = points[1].replaceAll("[", "").split(",");
                const c3 = points[2].replaceAll("[", "").split(",");
                const a = glMatrix.vec3.fromValues(Number(c1[0]), Number(c1[1]), Number(c1[2]));
                const b = glMatrix.vec3.fromValues(Number(c2[1]), Number(c2[2]), Number(c2[3]));
                const c = glMatrix.vec3.fromValues(Number(c3[1]), Number(c3[2]), Number(c3[3]));
                glMatrix.vec3.sub(dirX, b, a);
                dx = glMatrix.vec3.len(dirX);
                glMatrix.vec3.normalize(dirX, dirX);
                glMatrix.vec3.sub(dirY, c, b);
                dy = glMatrix.vec3.len(dirY);
                glMatrix.vec3.normalize(dirY, dirY);
                corner = glMatrix.vec3.clone(a);
                elevation = a[1];
                aspect = dx / dy;
                break;
            }

            // get the image preview
            case "Novorender/Document/Preview": {
                const url = new URL((scene as SceneData).url);
                url.pathname += prop[1];
                // This is the PDF image URL
                image = url.toString();
                break;
            }

            // get the top-level dimensions of quadtree
            case "Novorender/Document/Size": {
                const sizes = prop[1].split(",");
                topLevelWidth = Number(sizes[0]);
                topLevelHeight = Number(sizes[1]);
                break;
            }
        }
    }

    minimaps.push({
        aspect,
        image,
        dx,
        dy,
        corner,
        dirX,
        dirY,
        elevation,
    });

    minimaps.sort((a, b) => a.elevation - b.elevation);

    const minimap = new MinimapHelper(width, height, minimaps, glMatrix);

    // split the quadtree
    await minimap.split();

    return minimap;
}
In addition to obtaining the corner information, the function above also downloads the image URL for the previewCanvas, eliminating the need for separate downloading as mentioned earlier.
Usage example
Invoking the above method, downloadMinimap(), will provide us with a new instance of the MinimapHelper class. This instance will contain our quadtree, as well as other useful methods for interacting with both the minimap and the 3D space. The example below demonstrates the usage of the downloadMinimap function:
let preview: string | undefined;
let minimap: MinimapHelper;

if (sceneData) {
    minimap = await downloadMinimap(previewCanvas.width, previewCanvas.height, sceneData, glMatrix);

    // get the image URL for `previewCanvas`
    preview = minimap.getMinimapImage();
}
Updating the camera movements between minimap and 3D space
In this section we'll implement a mechanism to update the camera position on 3D space using minimap's x and y coordinates.
Let's start by adding a click listener on the minimap (previewCanvas) that will move the camera on the 3D space to the same position as the minimap:
previewCanvas.onclick = (e: MouseEvent) => {
    // Get the position of the click relative to the canvas
    const rect = previewCanvas.getBoundingClientRect();
    let x = e.clientX - rect.left;
    let y = e.clientY - rect.top;

    // `currenArea` will have a value if the previewCanvas is zoomed in
    if (currentArea) {
        const canvasScaleX = currentArea.width / previewCanvas.width;
        const canvasScaleY = currentArea.height / previewCanvas.height;
        x = currentArea.x + (x * canvasScaleX) / currentLevel;
        y = currentArea.y + (y * canvasScaleY) / currentLevel;
    }

    // this will move the camera on 3D space to same position as minimap
    view.camera.controller.moveTo(minimap.toWorld(glMatrix.vec2.fromValues(x, y)), view.camera.rotation);
};
The next step is to draw two direction vectors on the minimap. These vectors will point to the click positions (x and y) obtained from the click listener mentioned above.
The function below handles drawing and animating the direction vectors. We need to run this function on every frame change to detect the camera change, which is why you'll notice it being called within the render loop in demo.
function animate() {
    const ctx = previewCanvas.getContext("2d")!;
    // Run every frame to check if the camera has changed
    if (!prevCamRot || !glMatrix.quat.equals(prevCamRot, view.camera.rotation) || !prevCamPos || !glMatrix.vec3.equals(prevCamPos, view.camera.position)) {
        prevCamRot = glMatrix.quat.clone(view.camera.rotation);
        prevCamPos = glMatrix.vec3.clone(view.camera.position);
        if (minimap) {
            // Update minimap info based on camera position. Returns true if it changed the pdf to another floor
            minimap.update(view.camera.position as vec3);
            let imgUrl: string;
            if (elements?.length && currentLevel !== 1 && zoomedImage) {
                imgUrl = zoomedImage;
            } else {
                imgUrl = minimap.getMinimapImage();
            }
            loadImage(imgUrl).then((img) => {
                // Redraw the image for te minimap
                ctx.clearRect(0, 0, previewCanvas.width, previewCanvas.height);
                ctx.drawImage(img, 0, 0, previewCanvas.width, previewCanvas.height);
                // draw and animate directions vectors
                drawVectors(ctx);
            });
        }
    }
}

// handles the drawing and animating of direction vectors
const drawVectors = (ctx: CanvasRenderingContext2D) => {
    //Gets the camera position in minimap space
    const minimapPos = minimap.toMinimap(view.camera.position as vec3);

    //Gets a cone of the camera direction in minimap space, point[0] is the camera position
    const dirPath = minimap.directionPoints(view.camera.position as vec3, view.camera.rotation as quat, 5 / currentLevel);
    if (currentArea) {
        minimapPos[0] = (minimapPos[0] - currentArea.x) * currentLevel;
        minimapPos[1] = (minimapPos[1] - currentArea.y) * currentLevel;
        for (let i = 0; i < 3; ++i) {
            dirPath[i][0] = (dirPath[i][0] - currentArea.x) * currentLevel;
            dirPath[i][1] = (dirPath[i][1] - currentArea.y) * currentLevel;
        }
    }
    ctx.strokeStyle = "green";
    for (let i = 1; i < dirPath.length; ++i) {
        ctx.beginPath();
        ctx.lineWidth = 3;
        ctx.moveTo(dirPath[0][0], dirPath[0][1]);
        ctx.lineTo(dirPath[i][0], dirPath[i][1]);
        ctx.stroke();
    }
    ctx.fillStyle = "green";
    ctx.beginPath();
    ctx.ellipse(minimapPos[0], minimapPos[1], 5, 5, 0, 0, Math.PI * 2);
    ctx.fill();
};
Clicking on the mininmap now should draw 2 direction vectors pointing towards the click position.
Putting all the pieces together
The following demo combines all the code we previously discussed to create a quadtree, minimap, and synchronize camera movements between both views.
Please feel free to make any desired changes in the playground editorto suit your preferences or to meet your specific requirements.